
RV inverter installation Guide

Do you want to boondock off-grid AND run your higher wattage appliances like you can at a campsite with electrical hook-ups? This is where installing an inverter in your RV can make a big difference.
If you want to skip to the RV inverter installation process or any section you want, click the correspondent heading in the table of contents below.
Table of contents:
- What Does an Inverter Do? How is it Different from a Converter?
- What Type of Inverter Works Best for My RV?
- Options for How to Install an Inverter into an RV
- Step-by-Step Instructions for Installing an RV Inverter
- What Does it Cost for an Inverter Installation in an RV?
Before we do a deep dive into an RV inverter installation, let’s talk about different types of power and their respective sources. RV electrical systems run on two types of power. The first is Alternating Current (AC) at 120V which typically comes from a “shore power” hookup – an external power source that is connected to the electrical grid. When you pull into a campsite with electrical service and plug the RV into it, the fridge and all of your electrical outlets will run just like at home. The second system is Direct Current (DC), typically 12V, which runs off of the auxiliary battery bank (aka service or house batteries) in your RV. DC power often powers lights, vent fans, radio, slide out motor, power awnings, and USB outlets, among others. But, if you want to run both AC and DC appliances while off-grid, you’ll need an inverter. Learn more about DC and AC in another article: The Complete DC To AC Converter Guide.
What Does an Inverter Do? How is it Different from a Converter?
Most RV manufacturers install a “converter” into the RV’s electrical system so that your auxiliary battery will charge while you are plugged into shore power – it converts AC power to DC power. An inverter does the opposite of a converter; it transfers the DC power from your battery to AC power so that you can run AC appliances when you are not plugged into “shore power.” Most RV manufacturers do not include an inverter into the factory electrical system – unless otherwise specified. If you want to boondock (aka dry camp) with your RV away from the power grid and full-hookup campsites while still running some/all of your AC appliances, then you need an inverter as well.
The highest quality inverters are pure sine wave inverters, as these most closely reproduce the specific type of AC power supplied by the electrical grid. Many modern electrical appliances, laptops for example, require specific parameters of AC power, and could be damaged if plugged into a different type of inverter.
Renogy offers two types of pure sine wave inverters which come in a range of wattages:
Battery Inverters are designed to simply change DC power to AC so that you can run typical household appliances in your RV. Renogy’s line of battery inverters can handle loads up to 700W, 1000W, 2000W, and 3000W, respectively. As the capacity increases, so does the price, and the amount of power the inverter requires to run itself.
Inverter Chargers (also known as “through inverters”) do the job of a battery inverter as well as a converter, all in one device. They provide AC power from the DC battery source in addition to charging your batteries off of shore power when you are plugged into an electrical outlet. These are more complex and, thus more expensive, than standard battery inverters. Another reason to choose an inverter charger is if you’re upgrading your batteries from any type of lead acid (flooded, Gel, or AGM) to Lithium Iron Phosphate AND your current converter is not compatible with LFP battery charging parameters. Typically, only RVs manufactured in the past few years have LFP compatible converters, so be sure to check your specs if you plan to charge your batteries from shore power with your existing converter. Renogy makes inverter chargers which can handle loads up to 1000W, 2000W, and 3000W, as well as a special 3500W solar inverter charger for 48V systems. Once again, as capacity increases, so does the price, and the amount of power the inverter requires to run itself.
Basic RV Inverter Wiring Diagram
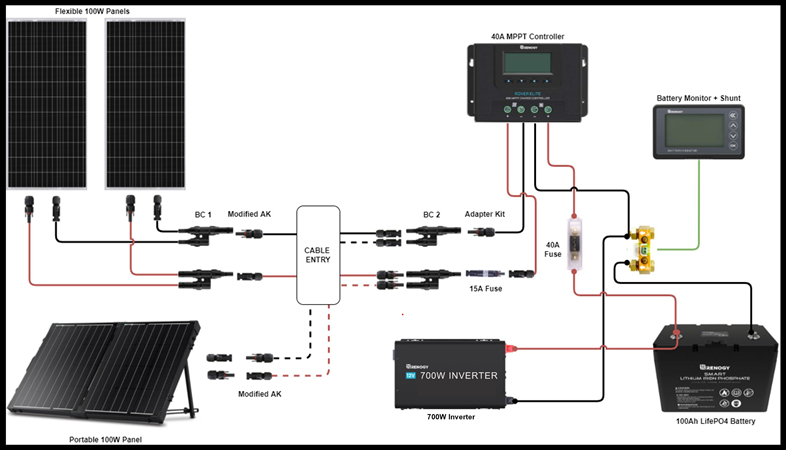
Basic Inverter Diagram
What Type of Inverter Works Best for My RV?
The type and size of inverter you need depends upon how you intend to use your RV, and the number of electrical appliances you want (or need) to run while not plugged into shore power. If you only plan to spend a few nights per week off-grid, and you don’t mind reducing the number of appliances you use during those times, you might be able to get away with a relatively small inverter like we have. However, if you want the ability to live mostly off-grid without sacrificing your typical AC power consumption, then you’ll need to install an inverter that can handle a much larger load. The amount you can run is limited only by your space constraints, the size of your battery bank, and of course, your budget.
To size an inverter, calculate your AC load, which is the total wattage of your AC appliances that you plan to run all at the same time. Let’s say you want to run your laptop, coffee maker, TV, and blender at the same time and the wattage on these appliances adds up to 1550W. Add an extra 25% of 1550W for a safe margin of error (1550 x 1.25 = 1937.50). You will need to purchase a 2000W inverter to be able to handle this load. If this number adds up to 850, you can easily get away with a 1000W inverter. If you are seeking to run a 10-15K BTU RV air conditioner (even for a short time), you’ll typically need at least a 3000W inverter and a large battery bank. In this case, you may also consider installing a higher voltage system such as 24V-48V.
Options for How to Install an Inverter into an RV
Important Safety Reminder: AC is a power source that has the potential to be very dangerous. If you are feeling uneasy about your ability to disconnect the power source, and work safely while installing these components, please contact a licensed electrician or solar power installer.
One of the first things to consider is whether you’d like to simply create separate circuits or do a full Integration into the RV’s electrical system. Most Renogy inverters have two types of AC output terminals: hard wired terminals for AC wire and standard household GFCI outlets. Using the hard-wired AC output terminal, you could fully integrate the inverter’s output into your RV’s AC breaker box (distribution panel) or you could choose a simpler output solution by using the GFCI outlets and connecting the inverter to an extension cord or single household outlet.
●Creating Separate Circuits by Using Dedicated GFCI Outlet (Using Battery Inverter)
This option can be done in one of two ways. The simplest option is to plug an extension cord into the inverter and use it to power any AC appliance when it is turned on. The second option is to wire a dedicated outlet or outlets directly to the inverter. These outlets will only work when the inverter is turned on. Example: Our 700W inverter distributes 120V of AC power to 2 standard household outlets within the camper via a simple extension cord. This AC wiring circuit is separate from the original electrical circuit that came with our camper, which simply had one 120V household outlet that could be powered when we plugged in the extension cord to a shore power source. You can watch our full installation video here.

●Full Integration via Hard Wiring + Transfer Switch (Using Battery Inverter)
Connecting the inverter to the RV electrical distribution panel requires that you install a transfer switch. Without this switch, plugging your RV into shore power with your inverter connected will permanently damage the inverter because power will be running backwards into the unit. The transfer switch isolates the inverter from the shore power source. When you unplug shore power, it can switch back to the inverter power output source. The transfer switch will need to be installed in a split distribution panel, and make sure that the inverter and converter are on different parts of the board so that they remain separate.
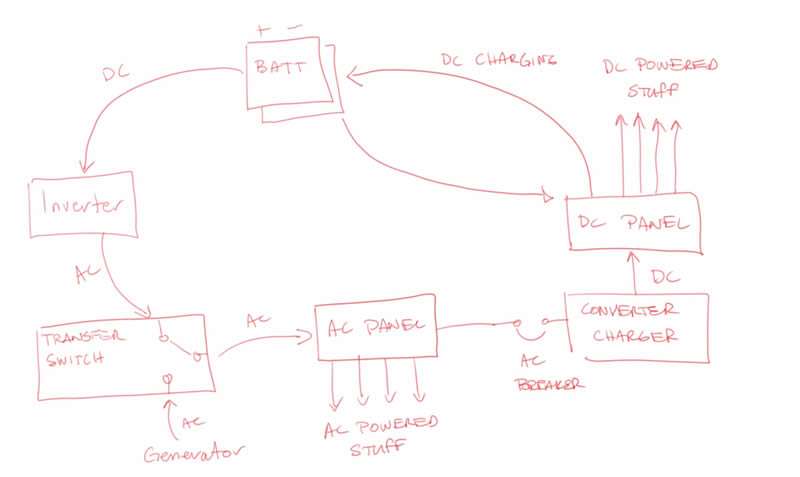
Inverter Charger Loop
Image credit: RVwithTito.com
●Full Integration via Hard Wiring (Using Inverter Charger)
This option comes with an integrated automatic transfer switch so you don’t need to deal with all the extra wiring and switch. Rather than isolating the shore power inverter sources separately, the inverter charger becomes part of the integrated circuit. When plugged into shore power, 120V AC passes through the inverter to the AC distribution panel; when off-grid the inverter draws power from the battery and delivers AC power to the distribution panel. Below is a RV inverter charger wiring diagram.
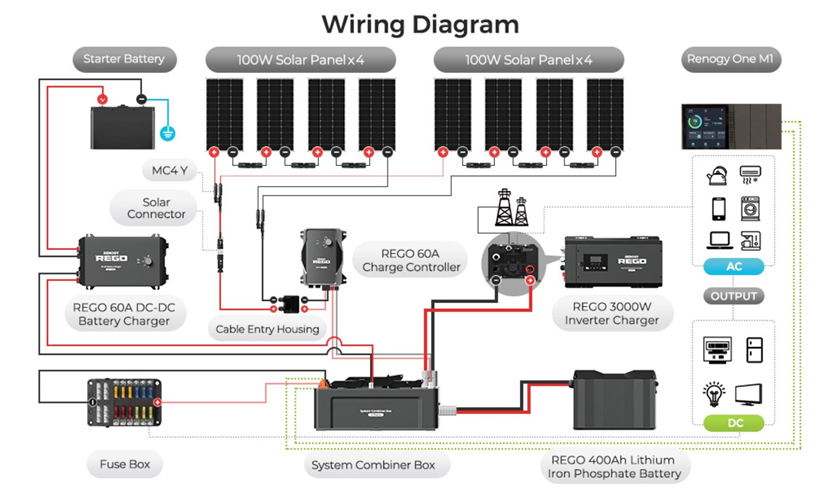
REGO Wiring Diagram
Step-by-Step Instructions for Installing an RV Inverter
Now that you’ve learned about the types of inverters and how they can be installed, let’s dive into the details of an installation. We recently coached some friends through their new REGO System installation and the biggest question mark in the project was installing the 3000W REGO Inverter Charger. We knew that fishing the solar panel wires from the roof to the solar cabinet would be a cinch, and that reconnecting the positive and negative battery cables to a newer and far more powerful battery would be easy, but connecting the inverter’s output to the RV’s control panel seemed somewhat “next level.” Once we inspected the RV’s electrical system, broke down the project into a few steps, and decided where to install the device, the inverter installation was very straightforward. So, stick with us…if we can do it, you can do this, too!
Important SAFETY Reminder: Before you begin, completely disconnect the RV from every power source, including shore power, disconnect the solar panels from the charge controller, and disconnect or turn off the battery bank if you have a “smart” battery. This will ensure no power is running through the system.
Choose an Inverter Location
●Ventilation: While doing its work, inverters give off heat and need space, especially around the cooling fan intake vents. Each installation has parameters specific to an inverter’s size and power. Be sure to read the user’s manual for space recommendations before purchasing your unit.
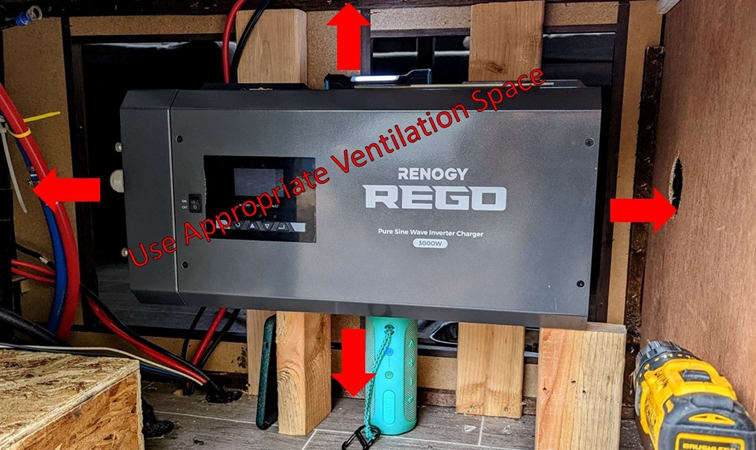
Ventilation Space Needed around Inverter Charger
●Proximity to Battery: The inverter should be installed close enough to the battery bank in order to prevent excessive voltage drop (see user’s manual). However, if you are using flooded lead acid batteries, do not install the inverter in the same compartment because of the potential for fire. Flooded lead acid batteries have the potential to off gas during charging and a spark from the inverter circuitry has the potential to ignite the gas. If you are using Gel, AGM, or Lithium Iron Phosphate batteries, you can install these in the same compartment because they are all sealed batteries.
Secure the Inverter
Depending on your installation location, especially in tight RV or van spaces, you might want to connect all the wires to your inverter prior to securing it in its final place. Most inverters will have factory installed mounting holes which make securing the inverter easy. Just be sure to maintain those space and ventilation recommendations.
Ground the Inverter
The unit will have an identifiable grounding connection lug, generally a bolt or screw connection (again, see your users manual). Insert or connect the grounding wire to the unit and then ground it to the common ground on your RV. This might be under the frame of the trailer, or on a common ground bus bar.
Connect the DC Cables to the DC Inverter Terminals
All Renogy inverters come with appropriately-sized positive (red) and negative (black) cables to connect the inverter to the battery terminals.
Connect to AC Outlets in Your RV - 3 Options
1. Separate Circuit with Extension Cord
●Plug extension cord into inverter AC output outlet
●Secure cord in desired location
2. Separate Circuit with Dedicated Outlet(s)
You can use either the inverter’s GFCI outlets or hard wire using the AC output terminal.
●Select location for electrical outlet & install electrical junction box.
●Run output wire from the inverter to the junction box.
●Connect the live, neutral, and ground wire to the electrical outlet terminal connections, secure outlet to electrical box & install faceplate.
●If installing additional outlets, install additional junction boxes, outlets, and connect to the first outlet in parallel.
Consider labeling the outlets connected to both the inverter and shore power to keep things organized during installation, and so you’ll remember what you did in the future.
3. Hard Wire Inverter to the RV Breaker Box (Battery Inverter & Inverter Charger)
Battery Inverter Steps
If you are connecting the inverter AC output to the RV’s breaker box, be sure that your inverter is large enough to power your intended load.
●Connect the AC output live, neutral, and ground wires to one of the transfer switch’s input terminals.
●Connect the transfer switch output terminals to the RV’s distribution box master breaker.
●Connect the shore power output to the other input terminal on the transfer switch. Be sure to use appropriately-sized wiring for the AC load.
Some transfer switches are manual, while others automatically detect which circuit is energized. Some transfer switches have the option to include a generator input which can detect a low voltage and automatically start an onboard generator.
![]()
Transfer Switch Diagram
Inverter Charger Steps
There are 2 major steps to this process which involve running and installing wiring and connections, then disconnecting the RV’s existing converter to eliminate this device from the system.
Install Wiring & Connections
There are a couple ways to accomplish this wiring, but here’s how we installed the REGO 3000W inverter charger. Again, turn off all electrical power coming into your RV.
●Identify the shore power wire that comes into the RV distribution panel. Cut this wire in a location where you can access either end, clearly label each end – black for shore power to inverter input & white for inverter output to RV distribution panel. These are the same colors used to indicate input and output on the inverter charger.
●Using 10 AWG* outdoor (waterproof) 3 strand, solid, copper wire, make a connection in an electrical junction box to the shore power black wire. This will be your inverter input wire which will span the distance between the distribution panel and the inverter. *Wire gauge is dependent on the size of your RV’s AC shore power system. 10 AWG was appropriate for our 30A system.
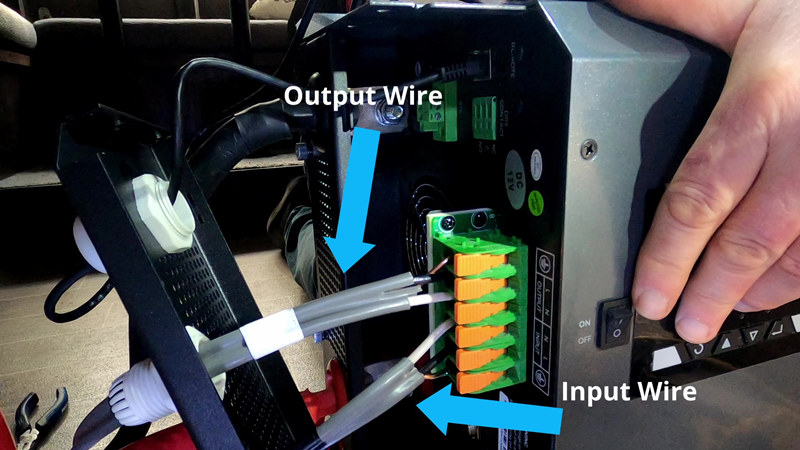
Input & Output Wires in Inverter Charger
●Insert the input wire into the inverter charger AC input terminal.
●Insert the same sized wire into the inverter charger output terminal. This is your inverter output wire which will span the distance between the inverter and the distribution panel.
●Make a connection, using an electrical junction box between the output wire and the white wire which is attached to the RV distribution panel.
●Jump to the distribution panel section of the video for details to see these steps in action.
Disconnect Converter
If using an inverter charger, and your RV came with a converter, you’ll need to disconnect it - since it’s now obsolete. This is a very simple process outlined in this video. After ensuring that no power sources are going to the RV and the distributions panel.
●Identify the converter (usually below the main distribution panel) and trace its wires back to the AC side of the panel.
●Unscrew the AC terminal connections and remove the white, black, and ground wires.
●Identify the positive and negative wires on the DC side of the panel.
●Unscrew the terminal ends connecting those wires and remove them from the board.
●Tuck the wires away and tape off the ends so that they are safely out of the way. Once you have removed all of the wiring between the converter and the distribution panel, you’ve made it obsolete. It is not necessary to remove the entire converter, unless you want to.
Connect Inverter Remote Switch & Install
Some models of Inverters come with a remote on and off switch that easily plugs into the inverter and allows you to turn the unit on or off from a handier location than your solar component cabinet. Most Renogy inverters come with nearly 20 ft of wire on their wired remote switches.
What Does it Cost for an Inverter Installation in an RV?
In addition to the price of the inverter, you’ll need to figure some extra costs into your installation. Depending upon how you choose to install it, you may need some or all of the following: AC wiring, household extension cord, fuses, bus bars, transfer switch, split panel, electrical boxes, electrical connections, and any necessary tools. It’s a good idea to put these into your overall budget so they don’t come as a surprise!
While there are so many things to consider when deciding which inverter to buy and how to install a pure sine wave inverter in an RV, we hope this guide helps narrow it down to a few simple questions. How often are you going to use your RV off-grid? How many appliances do you want to run while off-grid? And how do you want to integrate your inverter into your RV?
If you’re going to go off-grid with your RV, even for a short time, it simply makes sense to install an inverter. We simply couldn’t manage our off-grid life and small business in the same way without our Renogy 700W inverter.

In 2012, Shari Galiardi & David Hutchison left behind careers and a comfortable home in North Carolina to travel with the vintage camper trailer they lovingly restored, outfitted with solar, and named "Hamlet." What began as a short break from careers and responsibility quickly turned into a love affair with roadlife. They have parlayed their higher education backgrounds, desire for life-long learning, and thirst for adventure travel into writing, photography, video production, and public speaking gigs from coast to coast. Known to their friends as simply Shari & Hutch, you can learn more about their full-time, solar-powered adventures on their website at freedominacan.com. Or, follow them on Facebook, Instagram, and YouTube as “Freedom in a Can, LLC.”
Related articles:
What Is An Inverter For An RV | A Thorough Guidebook Hey there!
3000w Inverter Charger Vs 2000w Inverter Charger
Solar Microinverters: When Is It Best To Use Them?


